Using a Sound Card Modem
How can one decode satellite telemetry signals using a sound card modem.
This information is based on one of my first telemetry decodes and can be outdated on some points. But never the less the information can still be useful for those that start with decoding Satellite telemetry.
After I had posted a message on the Internet that I was succesfull in decoding the 9600 baud AX25 packets from STRaND-1 I got a lot of question on how I did it. With this article I’ll try to explain how I got it working. This information can also be used for other baud rates. First some general information regarding hardware and software versions. This information also applies to other satellites that use some kind of packet digital mode.
Hardware:
- HP Workstation XW4400, Intel Core(TM)2 CPU 6600 @ 2.40 GHz, 2.40 GHz Internal memory is 4Gb and running with a 250Gb SATA disk. Onboard audio interface, Realtek High Definition Audio.
- FUNcube Dongle Pro+ (Connect this with a high quality USB cable to you computer. Try not to use a direct connection to an USB board on your computer)
- SSB SP-7000 preamplifier
- Maspro 435HS20 Right-hand/Left-hand Circularly Polarized
Software:
- Windows 7 Ultimate 64Bit Service Pack 1
- AGW Packet Engine Ver 2010.414@1994-2010 (AGWPE)
- Online Kiss from DK3WN look at his download page for the latest version (When using MixW in kiss mode)
- AGW Online Kiss from DK3WN (When using UZ7HO or AGWPE)
- SDR# (pronounced SDRSharp) I use the current version v.1.0.0.1144. Follow the link and download a version that support the FUNcube Dongle Pro+
- MixW version 2.20f (Multi mode)
- UZ7HO 300, 1200 baud AX25 and 9600 baud G3RUH Soundmodem
- VSP Manager 1.0.3.01 (create virtual serial port pairs)
SDRSharp
Lets start with the basic reception. I downloaded SDR# uncompressed the zip file and placed everything in a directory I created for this purpose. Make sure your FUNcube Dongle is connected and start SDRSharp.exe. When this is done, select the FUNcube Dongle Pro+ (or another type) in the upper left corner. Now press Start and you will start to receive signals. Look at the following image to see if your settings are similar to mine. The configure option is to fine tune the FCD and I will not go into that in this article.

 If everything went well, you now hear audio coming from your speakers and you can listen to all the stations your antenna and FUNcube are capable of receiving. Just play with the frequency and get acquainted with this wonderfull piece of soft- and hardware.
Redirect audio from audio out to audio in from an other application:
Microsoft Audio Mixer:
(This also applies for other software that requires audio input from your receiver) So now before we begin with AGW Packet Engine there is a tricky part. You hear the audio coming from your speakers but we have to find a way to use this as an input for AGWPE. This can be a pain. I am fortunate that I can activate audio mixer within Windows 7. There is a catch, there is an option show disabled devices within Windows 7 when you open the audio properties, in my case I could enable the mixer and use this to route audio out to the mixer and use that as a input for AGWPE. (Look at the image) If you don’t have a mixer device and can’t find a device driver for your audio interface then there is allways the option of buying VAC (Virtual Audio Cable), this also gives you the opportunity to route your audio signals.
Virtual Cable:
An other option is to use VB-CABLE this software gives you a virtual audio in and a audio out. VB-CABLE allows routing signal from an application to another one. Typical application for the Virtual Audio Cable is to route your sound to an audio software in order to record and analyze it.
Link to Separate Software modems page
 AGW Packet Engine:
Now that this is done, we can configure AGW Packet Engine. Similar to SDR# I unzipped the software in a directory and started “AGW Packet Engine.exe” after that, you can right click on the button that appeared in your taskbar and select Properties. We are just interested in receiving so pay no attention to transmit and select a port that isn’t in your system, I choose LPT3. The option TNC Type gives us the opportunity to select Sound-Card and options the right audio interface. When this is done check options again and compare with the image on this page where the settings are shown.
Here you can for example see the onair baudrate that we want to decode. If you need or want to adjust the onair baud rate this and the TNC commands tab is the way to do that. In my case this wasn’t necessary.
 And now for the final step, but this is an easy one, we have to configure AGW OnlineKiss to connect to the AGW Packet Engine. This is done in an ingenious way. When AGWPE starts the first time you get a Windows firewall warning and I hope you have allowed this exception. Because AGWPE opened a port 8000 on localhost address 127.0.0.1. This address is used by AGW OnlineKiss to connect to AGW Packet engine. Just give it try and push the connect button within the AGW OnlineKiss program, immediately you should see a message saying that it is connected to ports you configured whitin AGW Packet Engine.
After working with this setup and experiencing decode problems I found another nice piece of software that is part of AGW Packet Engine and that is the Sound card tuning Aid. When you right click on the AGW tray icon you can select this option. Now you can check if audio in/out is ok by looking at the signals that are received and if they look correctly.

Details can be found at Soundcardpacket.org, look especially at the examples on how the signals should look.
After experimenting with AGW Packet Engine and a hardware TNC (TNC3S) there where still a lot of frames that I couldn’t decode in the right way. After exchange information with VK5HI, DK3WN, N8MH, Alan Cresswel and Chris Bridges I wanted to try an other software packet modem that support the kiss protocol. It seems that MixW also has a option to use it as a kiss modem. (This remark has to do especially with STRaND-1)
MixW:
Here I’ll explain on how to setup MixW so you can use it as a packet modem that supports the kiss protocol. MixW can be downloaded from there website and you can use it for 15 days before you have to register it. MixW will emulate a kiss TNC via a virtual null modem connection. (So all software that requires a serial interface can be used with this modem setup)

Configure the Packet mode by selecting Mode settings.
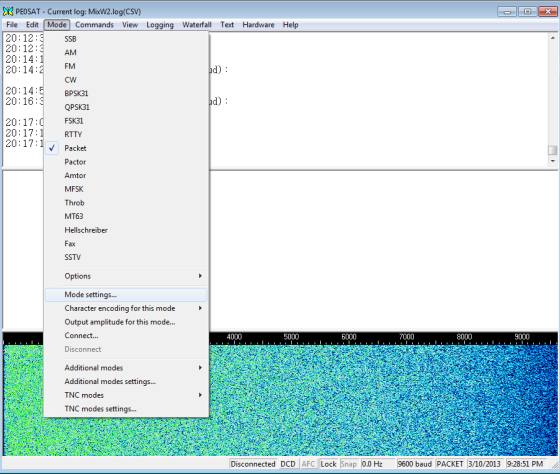
Configure for 9600 baud packet and kiss emulation in the following way.


Now comes the tricky part, to emulate a kiss TNC and be able to connect to it, you need a virtual serial port. You’ll have to install for example VSP Manager and follow the installation to the letter (I chose this one, because it supports 64bit). This installation and configuration can be found on the following wike page. Only after this is done you can configure the MixW TNC emulation. When you have installed VSP the following software will be available.

So VSP Manager is installed in the right way and we can now configure TNC emulation. Select TNC emulation as shown in the bolow image.

 I created with VSP Manager a serial bridge between serial port 9 and serial port 10. Within MixW TNC emulation I select port 10 with the paramaters as shown in the image on the right. Make sure that “Disable device” isn’t selected.
Now when this is all done, you can connect Online Kiss to port 9, this is the other port in the bridge configuration and test this setup. In my case I went from 75 STRaND-1 frames to over 350 frames and there where frames that could be decoded with the STRaND-1 telemetry decoder from DK3WN.
Separate UZ7HO Soundmodem information.
IQ data:
One nice option that can help you to decode at an other time, is the record function within SDR# this saves a large wav file that you can open and playback at a later time. When you alter the radio option and select IQ file (wav) then open the file you saved and start SDR#, everything that is received during the time you recorded can now be listened to again. So maybe it is idea to first record a STRaND-1 pass and afterwards replay to see if you can decode the data.
Remarks:
- When you use MixW to decode STRaND-1 9600 baud telemetry it seems that the MixW packet decoder is dropping all frames which are shorter than 15 bytes. Therefor the OBC data isn’t shown in the decoder software. I will try soundmodem from UZ7HO to see if that is working better. (Thanks Mike DK3WN for this information)
- When you want to decode Triton-1, you can use MixW in the following way, select packet and then select the 1200 baud psk satellite mode decoder or make sure you have the latest UZ7HO version that also supports BPSK. The results with UZ7HO are in my case better then with MixW.
If something is missing or not clear enough, contact me via the contact option in the top bar.
- March 5, 2012 version 1.0 initial
- March 10, 2012 version 1.1 (Added MixW)
- May 17, 2012 version 1.2 (Added UZ7HO Soundmodem)
- July 26, 2013 version 1.3 added the section remarks.
- September 05, 2013 version 1.4 added VB-Cable.
- March 1, 2015 version 1.5 UZ7HO version 78 now supports BPSK.
- April 16, 2015 version 1.6 UZ7HO version 81 now supports QPSK.
- April 16, 2015 version 1.6a UZ7HO hs version 0.03 now supports G3RUH, Manchester and HAPN.
- June 29, 2015 – Decoding Block Diagram
- September 16, 2016 – separate software modem page.
- September 18, 2016 – Placed the remark that this information can be outdated, but useful.